16 Jun 2012

How to Clean your Makeup Brushes!!!

I get asked about this all the time, so I thought I'll write up a blog with a step by step direction along with some tips & advice.....

First I just want to say that I cannot stress how important it is to wash your makeup brushes on a regular basis. The amount of bacteria that can build up is one of the main causes for those little horrible and unnecessary break outs we get :( You have to remember that we use our brushes everyday, or more than once a week at least.... that same brush is being dipped, dabbed in the same product every time (i.e foundations) and if your not washing those brushes the bacteria is not only building up on the brush but on the makeup products you use too. Makeup is also about good hygiene.... and if you want to achieve that flawless look then you need to make sure you're tools are at their best too.

Before I start with the step by step directions here's a little information on one of the products I use....

Extra Virgin Olive Oil.....

Extra Virgin Olive Oil

Extra Virgin Olive Oil is the pure oil obtained from the fruit of olive trees. It has 101 uses, which I wont be listing here, don't worry lol... but just for those who want to know, here's what I use it for:
  • Body oil - great for dry Skin
  • Hair oil - leave in over night, after a good wash you hair will be silky smooth
  • Tame Frizzy Hair - use a pea size amount, spread all over the palms of you hands and then lightly spread on dried/styled hair...
  • Makeup remover - use a damp kitchen towel/tissue/cotton pad, pour a few drops, spread around the damp product and wipe off makeup (good money saver than them expensive face wipes)
  • Makeup Brush Cleaner (see below)
  • Nail Cuticles
  • I don't cook but I'm sure my mother uses it in her cooking too
So you kind of get the idea that olive oil really can be used for a lot of beauty regimes and is a money saver ;) It can be found at local supermarkets, pharmacies...

On with the brush cleaning.... here's what you will need

Dirty brushes, Shampoo, Oil & Tissue
  1. Kitchen tissue/towel - to clean the brushes on
  2. Dirty Make up Brushes - obviously
  3. Olive oil (you can try another, I have also used Johnson's Baby Oil) - helps deep clean the brushes and remove any dirt and remaining colour 
  4. & Shampoo - just like your own hair, you want to have you brushes smelling and feeling fresh and like new....and to also get the oil out :)
Thats all you'll need.....

Step 1:
For this step you need the below....


Makeup Brush & Tissue
This step demonstrates how to break down the colour from your makeup brush and really clean out the bristles. The point of deep cleaning your brushes is to ensure that the bristles are cleaned within and all the colour left inside the brush, which you cant see, is cleaned out also.
Here's how I clean mine....

Cleaning the brushes in Olive Oil

I've found that pouring the oil out on to a flat surface works better than having to pour it bit by bit on the tissue, so once I've poured about 2 tables spoons (depending on how many brushes you have to clean), I take my dirty brush and dab it in the oil so that the bristle are just lightly coated. Please be sure not to soak you brushes in the oil as it will be harder to wash out.
Next with the tissue placed in the palm of my hand, I work the brush in a gentle, circular motion to start breaking down any colour on the brush.

If you feel like there is more colour still left in the brush you can redo this step.
Both the above brushes have been cleaned twice in the oil step.
The darker  patch is the first round were a lot of the colour broke out.
 
Here's another brush with a lot of pigmented colour...

I love cleaning brushes that have a lot of colour on them :)

And here's what my tissue looked like at the end....


I used the one tissue for all my brushes, no point wasting stuff.......

However if your brush has only been used the once with a light colour for example a translucent powder, you can skip this step and go straight on the next step, the shampoo.

Step 2:


Again just the like the oil step, you want to find a flat surface near a tap to pour your shampoo on... I prefer this then having to pour it out bit by bit onto my hand each time.

Shampoo step...

Don't be afraid to coat the brush here with the shampoo as this will clean out the oil from the previous step as well has any dirt and colour still left in the brush.

Cleaning the brushes in the shampoo

To clean the brush you want to follow the circular motion from before, you can also squeeze the foam from the shampoo and just like you own hair I guess, run your fingers through the bristle...if that makes sense :/
Then hold the brush under running cold water until the water runs clear. Be sure not to hold your brush upright through out this step as you do not want water to sink in to the body of the brush and also remember when washing the brush we do not want water to go beyond the metal part which holds all the bristles together. If you do this you will ruin your brushes and they will slowly fall apart. Lastly, squeeze out all the water left in the brush and be sure to shape you brush while its still damp.

I had to wash this brush twice till the foam was white and clear of colour

Step 3:
Once you've finished with all your makeup brushes, all you need to do is lay them out to dry.


Cleaned, shaped and ready to dry :)

I lay mine flat on its side to dry with the bristle part on a tissue...... and that's about it :)

Its as easy as that, and if it means you'll have clean tools and less germs then believe me its worth doing!

Quick note, you can also use a brush cleanser to do a quick clean of you brushes, specially when you need to use a brush for more then one colour during one look. I use the below cleanser in the same circular motion on a tissue, but this time I pour a little of the product on the tissue first.


M.A.C Brush Cleanser £8.50
Hope you enjoyed this Blog post x


10 Jun 2012

Sleek Pout Paint

Some more Sleek reviews :) I will be doing other reviews too but might as well get Sleek out of the way......

Sleek Pout Paint is a Lip Pigment which comes in a small sized tube perfect for you to carry around in your purse. This lip product is not a lipstick nor a lip gloss but gives the look of both also there's a wide variety of colours to choose from and you can mix it up too. If your familiar with the OCC Liptar you will know what I'm talking about, if not then read on.

Pout paint is an amazing product to have, its something you can be really creative with or just stick to a simple look with. The best thing about this product though is that you only need the most tiniest amount, like I cant even think of something to compare it to, maybe a small zit lol (of all things), as that will literally cover the whole lip area what ever the size... I'm serious, have a look below..... 

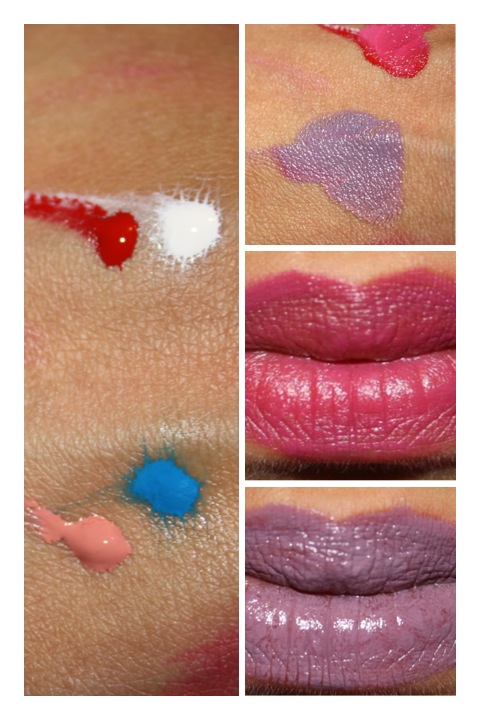
Order of Pout Paint in the top left hand pic only: Cloud 9 153, Pin Up 157, Port 159, Rosetta 158, Minx 161 & Peek-a-bloo 163 
From the picture above you can see the amount of product I used on the lips,if anything there were some left over. The lip colours in order from the mid left picture are Minx,Rosetta,Port & Pin Up. You can see how pigmented they are and what I meant by 'not a lipstick nor a lip gloss' they give great coverage and last a long time. They do, however, dry after some hours of wear but a bit of clear lip gloss will sort that out. 

Now your wondering what the White (Cloud 9) and Blue (Peek-a-bloo) colours are used for... well they help change the colours of the pout paints, Peek-a-bloo will add depth and warmth and Cloud 9 will lighten the colour. If your daring and couldn't care less about what others say then by all means wear these colours out, alone on your lips. Check out the picture below to see what colours I mixed up and what I created...

Pin up & Cloud 9 - Minx & Peek-a-bloo
I mixed Pin up & Cloud and got a lovely Pink, with Minx & Peek-a-bloo I got a very nice Lilac but not a colour I would wear out :/ 
The pout paints are £4.99 at Superdrugs here in the UK. I bought the above colours because the range of colours they have are quite similar and you can easily mix and make another colour in the line. Other then the Orange called Lava I bought the most prominent colours they had.
Well I hope this helped someone out there :)
If you have any questions or requests please leave a comment below. x


9 Jun 2012

Eldora - False Eyelashes

Eldora sell some amazing False Eyelashes, I have tried brands like Eylure, Red Cherry and so on but these lashes for the price are really worth it and as a Makeup Artist I needed eyelashes that were reliable and affordable..the lashes are also reusable. I've been converted and have been shopping with them since. They have a range of False Eyelashes from simple, natural looking to outrageous, funky in-your-face lashes!!

Went a bit Craaaaazzzyyyy!
Before I go on here is a link to their website; http://www.eldorashop.co.uk/ and this is their Facebook page were they have regular competitions http://www.facebook.com/pages/Eldora-False-Eyelashes/170045198109

Eldora sell their goods online and one main problem, for me anyway, is not being able to see, feel, try what I'm buying.... especially eyelashes. We all have different eye shapes and different taste when it comes to stuff like this and although Eldora have good pictures on their website it still wasn't good enough for me. Nevertheless I went ahead and ordered a number of lashes and thought ill try them all out.

So I thought I'd share with you guys what my first impressions were :) and some picture....

First I wanted to write about the packaging. The below images show you the packaging the false eyelashes come in, its your normal little box made out of card, I believe, with their logo printed on a Yellow background. I've never received the products damaged in the post or anything like that so its good enough. You can also see the items you receive, which are the eyelashes, tray and adhesive. The next image is the back of the packaging where they have put directions on for their customers and glue ingredients.

Outer Packaging, Tray with Eyelashes & Adhesive
Back of the packaging
OK... I don't want to go on and on and on so I'm going to post the pictures with a little description below..... Enjoy! :)

H104
A Natural looking set, perfect to give your own some length and volume but still look.... real.

H105
These are Natural but not so natural if that makes sense :) The hairs on these are more separated and longer making it a little obvious.

H106
 One of my favourites! These look really natural on the eye, just giving a little depth to the corner of you eye. you can probably even wear these out in the day.

H122
 Another favourite! These might look a little out-there and in-your-face.. but I promise they aren't. I love these , they give you volume, length with out looking too fake.

H125
 These lashes are great for a night out, paired with a smokey eye look. They are longer at the end which will elongate your eye and also add length and volume. 


H126
 These are a shorter version of the above, H125, they don't fit on my eye so I just use them on the corner using only the last 3 strips.

H128
 Another natural looking set. When your own lashes are combed in with these they will look fabulous. I would wear these out in the day :)

H131
 Some in-your-face lashes... this set gives a lot of volume and stand out a lot! perfect for a party, night out and bridal. Probably not suited for those who prefer the natural look 

H140
Well..... I think these speak for themselves lol. Thank god I only ordered 1 pair of these. They aren't my cup of tea but hey maybe a client might end up asking for something like this and it might be something you're interested in... 

So I hope this review/information helped you guys make some decision.... just a few more notes about Eldora.... They are fast with delivery, friendly, reliable and provide a great range to suit you all.
Below I have some tips for using False Eyelashes :)

TIPS: 
1. Always let the glue dry a little and become tacky before you apply them to your eyes
2. Measure the false lashes against your own to see if you need to cut the length a little.... this is very important! 
3. If you wish to re-use your false lashes then apply mascara to your own lashes first and the stick on the false lashes. If you do not want to re-use the false lashes then I advise to stick on the false lashes and then mascara the your own lashes and the false lashes together....I'm confusing myself writing 'lashes' all the time... I hope I'm making sense...:)